(photo: homemade yogurt courtesy of bfeedme.com)
History of Yogurt
Historical fun facts about food provide great joy for me; I can’t explain the phenomena but I enjoy the epistemological randomness that, for example, yogurt prior to the mid and late 19th century was used primary as a cleaning agent (that’s right, including as a body wash and shampoo)! In the early 20th century a Greek named Isaac Carasso started a small business called Danone and began mass producing yogurt. In Europe, yogurt consumption took off as a popular milk product around the same time Danone began selling his product and the trend quickly spread to the United States 10-20 years later.
In modern day Italy,
yogurt consumption is on the rise, especially in the northern cities. You’ll see yogurt at most European cafes and in the lunches of Italian office workers and school aged children, for example. As a young American child, I consumed yogurt with pre-packaged fruit and then quickly abandoned it as soon as I went on my food strike as a grammar school aged boy (this was a dark time for me and my family, as my poor mother wondered why her son wouldn’t eat her wonderful ethnic fair). More on my food strike in a later post, but you can rest assured that I’m currently quite fond of yogurt, consuming it daily as a breakfast with honey, banana/pear/peach (or other available fruits), and raisins or as lunch dessert (usually with just a bit of honey).
Making Your Own Yogurt at Home
Our esteemed fan Dr. K. recently made his own yogurt and, as always, I was so impressed I had to share his method and photos with our lovely Scordo.com audience. So, without further pontification, here is Dr. K.’s proprietary homemade yogurt recipe (in his own words):
Yogurt is a simple, yet wonderful food. It is an excellent source of calcium and vitamin D, and also contains probiotics that are felt to have a number of health benefits. It is also incredibly versatile. Yogurt can be incorporated into breakfast, lunch, dinner, sauces, dressings, and dessert. You can purchase yogurt at the store, but if you consume as much as my family does, this can get expensive. Also, most of the dizzying varieties of commercially produced yogurt are not fresh, are not produced from high quality milk, and contain unnecessary sweeteners, stabilizers, additives, and preservatives, negating yogurt’s health benefits. Fortunately, good, healthy yogurt is surprisingly easy to make at home, and by doing so a small investment in time can yield a huge quantity of fresh and flavorful yogurt.
The Process
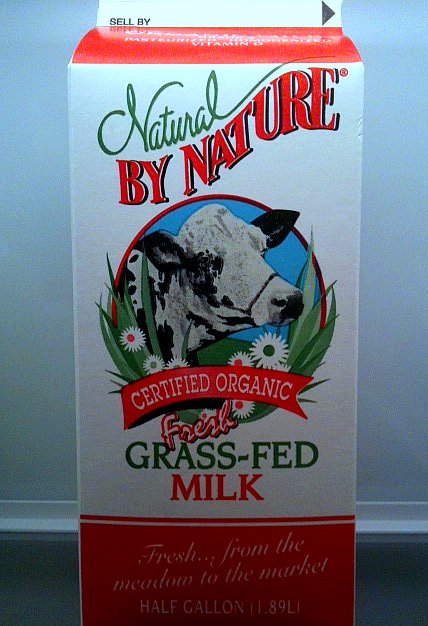
First, start off with a half gallon of the freshest, highest quality milk you can buy. Raw milk is fine if you can get it in your state, but most experts would recommend that you pasteurize it (which you can do at home) before consuming it, especially if it will be fed to infants, elderly, or those with compromised immune systems. Do not use ultrapasteurized milk, which via overheating has lost the majority of its taste and nutritional content. If possible, obtain milk from locally raised, grass-fed pastured cows (see photo). You can use whole milk or reduced fat milk, even skim milk, although the more butterfat in the milk, the richer and creamier your final product will be.
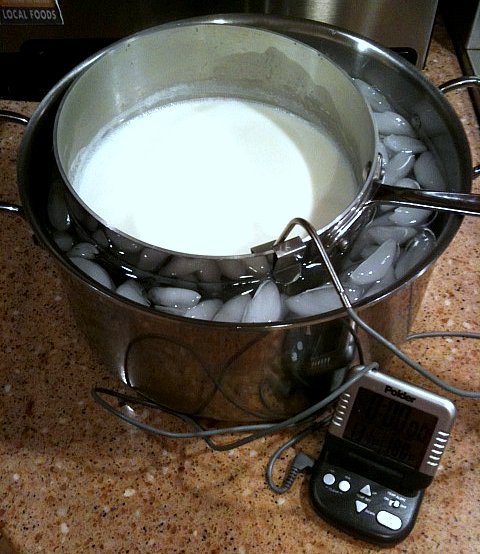
Pour the milk into a pot and heat this on the stove to 180 degrees Fahrenheit, till just before scalding temperature. You do not want to boil the milk. You will need a thermometer to check the temperature. I like to use one that clips to the side of my pot and has an alarm that I can set to go off at the desired temperature (see photo). Stir the milk occasionally as it heats. Once the milk gets to 180 degrees, remove the pot from the heat and let it sit for ten minutes.
Now, take your pot and place it in a larger pot or kitchen sink filled with ice water. Do not get water into your milk. Monitoring with the thermometer, allow the milk to cool to 112 degrees F. Don’t walk away for too long, this can happen fairly quickly. Next, pour the milk into an insulated container. I like the Yogotherm (see photos). It’s inexpensive, and besides yogurt, can be used for a number of home cheese- and dairy-making projects, such as buttermilk and fromage blanc. However, if you don’t want to invest in this, you can simply pour the milk into a suitably-sized container or containers that you will then wrap with towels and place in a cooler to maintain the temperature.
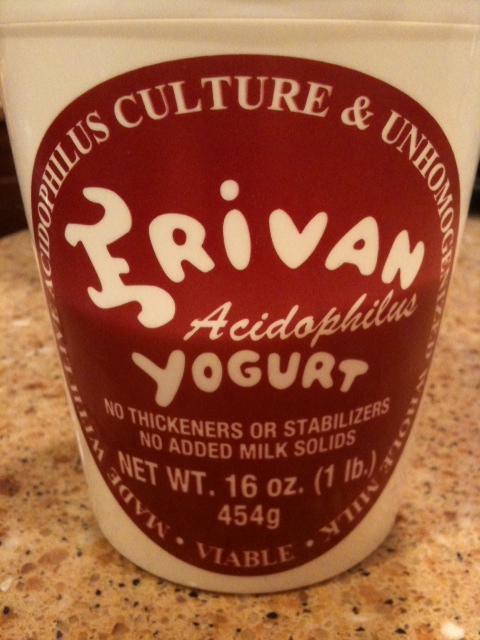
For a half gallon of milk, add about a third of a cup of very fresh, plain, whole milk live culture yogurt (see photos for an example), either bought at the store (or from your own homemade yogurt once you’ve made some). There shouldn’t be any other additives, sweeteners, or preservatives. You can also purchase packets of dried yogurt culture through a healthfood store and at some groceries, or online via the New England Cheesemaking Supply Company (you can also purchase a Yogotherm from this great online source).
Let the yogurt or powdered culture sit for two minutes, then stir it briskly to mix for a few seconds. Cover the container tightly with a lid, and either place it in the Yogotherm and cover it, or wrap the container in a few towels and place it in a well insulated cooler. You’re trying to maintain the temperature around 110 degrees, but you do not need to monitor it.
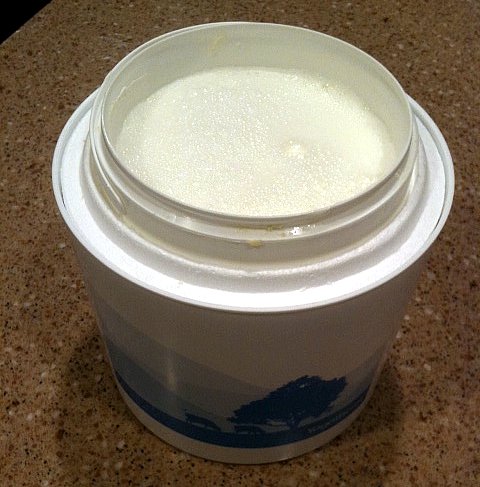
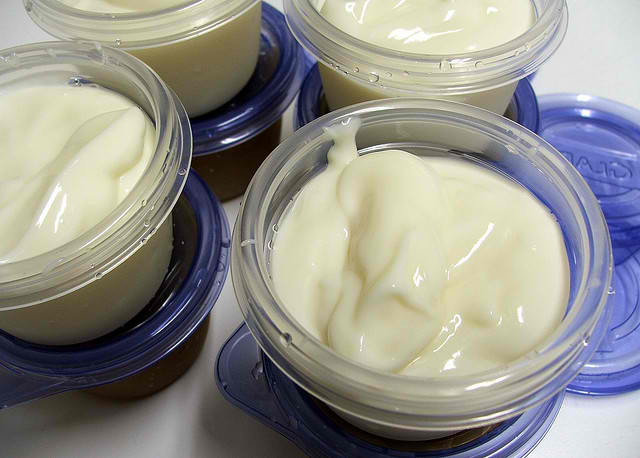
Let your yogurt sit in the Yogotherm or cooler for 8 to 12 hours. Then remove the container from the Yogotherm or cooler and place it in the refrigerate to cool. Once cooled, it is ready to eat (see photo), and will keep for a couple of weeks in your refrigerator, but it usually won’t last that long. Enjoy it with fresh or dried fruit, chopped nuts, and drizzle of honey, or with homemade granola. Add it to your oatmeal or pour it over a freshly baked muffin. Use it to make salad dressings or tzatziki sauce (great with lamb dishes). Add some chopped cucumber and fresh mint to make raita as a condiment for Indian cuisine. Put a dollop on top of pureed bean or squash soups. Use it to culture fresh cream to make your own creme fraiche or cultured butter at home.
If you enjoy Greek yogurt, which has a thicker consistency, just hang your yogurt in a tightly woven cheesecloth or butter muslin, and let it drain to half its original volume. Just be sure to save the whey for baking or to use as a substitute for water when making oatmeal and other hot cereals. Once you’ve made your own yogurt, and realize how much money you’ve saved for a fresher and better product, you will find it difficult to ever buy yogurt again!
Related Posts from Scordo.com

Timely post! I just bought a yogurt maker and made my first batch this week. I’m thrilled to have crossed off one more thing that comes in a plastic container from my grocery list. My recipe needs a little tweaking but I’m happy with the result and the purchase!
I think every recipe always needs a little tweaking, I’m sure you’ll not only save tons but in the end will make a better product (that is, great yogurt!).
Send pics I’ll post them here!
Best,
Vince
Ultra pasteurization does *not* affect the nutritional content of milk. It may affect the flavor, but the nutrition is intact.
Homemade Whole Wheat Pita Recipe
(photo: courtesy of Dr. K; pita bread puffing up in the oven)In the spirit of spreading love on Valentine’s Day I’d like to share a wonderful bread recipe and guest post by way of Dr. K. This week the…
I love making my own yogurt, and this is pretty much my recipe. But, no idea I could use the leftover whey in hot cereal! Will have to try it!