The following is a guest post from our friend and loyal fan, Dr. K. Click here for all of Dr. K.’s guest posts.
You don’t have to be an Italian or of Italian descent to recognize the heralded position that the tomato holds in the pantheon of Italian cuisine. But without some careful planning, it is not possible for most Americans to enjoy fresh, high quality tomatoes year round if you’re living in the United States. Store bought tomatoes just don’t make the grade (if you want to know more about what you’re seeing in the grocery store in January, beware). Hence our method for dehydrating tomatoes: making your own sun dried tomatoes.
As we enter the waning days of summer and you’ve had your fill of tomato salad, Caprese salad, and fresh tomato sauce on your pastas and pizzas, you may be searching for a way to preserve some of nature’s bounty so that you may enjoy that great tomato taste throughout the colder months. Passato is an excellent way to enjoy the summer tomato crop in sauces, stews, soups, and braises year round, and you can find wonderfully detailed descriptions of how to can tomatoes here on Scordo.com. Canning whole tomatoes is another popular way to enjoy tomatoes in the winter. As a simpler alternative, you can also peel and freeze tomatoes whole, and thaw them out to use for cooking (these aren’t eaten raw due to textural changes from the canning or freezing processes).
Yet another easy way to enjoy tomatoes past their season is the sun dried tomato. For quite some time, I was rather fatigued of sun dried tomatoes, as they were trendy and ubiquitous on restaurant menus 10-20 years ago, appearing on nearly every appetizer, salad, or entree you could imagine. Like the misunderstood and maligned anchovy on substandard pizza, the ubiquity of mediocre sun dried tomatoes everywhere you turned was a bit of a turn off to me. Fortunately, that fad seems to have diminished. Made properly with high quality tomatoes, sun dried tomatoes can be a delectable way to enjoy the flavor of tomatoes at any time of year.
Sure, you can go out and buy a bag or jar of these at your local market. But what you’re getting may be no better than those “fresh” tomatoes they’re selling in January. Sun dried tomatoes are easy to make at home with minimal effort or equipment. With good quality, local tomatoes, they will taste far better than anything you can buy in the store (as with most things homemade). It’s also a nice way to manage inventory if you’ve got a bumper crop of tomatoes from your garden.
Now for a dirty little secret: the tomatoes I’m going to show you aren’t truly sun dried. Here’s the other dirty little secret: the ones sold as “sun dried tomatoes” in stores usually aren’t either. The USDA doesn’t require that they actually be dried by the sun to market them as such, and very few actually are. And feel free to try for yourself, but most people reading this don’t live in a climate that will allow you to successfully dry tomatoes in the sun. So, let’s get started.
- X pounds of Plum, San Marzano, or Roma tomatoes
- First, select your tomatoes. They shrink quite a bit (up to 90%), so bear that in mind when you get started-- make sure you have enough tomatoes to make it worth your time! You can use any kind of tomato, but the more watery varieties will take longer to dry and make more of a mess. The paste varieties (e.g., Roma, San Marzano) are ideally suited for this. If possible, grow them yourself. It will be hard to find anything better. If that isn't an available option, try to find a local source using sustainable agricultural practices. You're going to be eating these, and they're going to be much healthier if they're not sprayed with pesticides and other chemicals.
- Wash your tomatoes in water (no soap, please). I like to use a produce scrub brush to remove any dirt from the surfaces. Pat them dry gently with a towel (don't go crazy, you're going to be drying them with heat anyway). If you're using smaller paste tomatoes, cut them into halves or quarters depending on the size of the tomato and the size you'd like your pieces to be. Larger sections will take longer to dry. If you're using very large tomatoes, you may need to divide them into smaller pieces. Remove the stems and any parts that look like anything you wouldn't want to eat. You can peel the skins (by dropping the tomatoes into boiling water till the skins crack and then shocking them in ice water - they'll peel right off) and remove the seeds as well, but this is not necessary and may detract from the flavor. However, if you're using a more watery, slicing variety of tomato, you may want to scoop out some of the water and seeds to hasten the drying process.
- Now for the drying. There are a number of ways to dry your tomatoes. Since laying them out in your yard is unlikely to work, you will need an alternative heat source. Some people have dried tomatoes on the dashboards of their car on a hot summer day. This may be fine if you want your car to smell like dried tomatoes and you don't plan on driving anywhere for a day or two. I wouldn't generally recommend this technique, but if that's the way you choose to live your life...
- You can use your oven set to 150 degrees or the lowest setting attainable. If you have drying racks, put the slices of tomatoes on the racks to allow the heat and air to circulate thoroughly around the tomato slices. You can use sheet pans or cookie sheets, but you will need to stir the tomatoes periodically so they can dry evenly, and they will be more prone to sticking. Sprinkle the slices with sea salt or kosher salt. You can also sprinkle them with herbs if you like (basil or oregano, for example), but I prefer to season mine in herb-infused olive oil after they have completely dried. The tomatoes will be dried in 10-20 hours typically, but this will depend on the water content of the tomatoes, the size of your slices, your oven, and how dry you want them. You'll want to keep a close eye on them. They should be deep red and leathery, flexible but not brittle. Usually they'll be about a fourth of the size of what you started from. You can shorten the cooking time by cranking the heat up higher (up to 200), but this may over dry the tomatoes and you'll risk ruining the batch if you're not watching carefully.
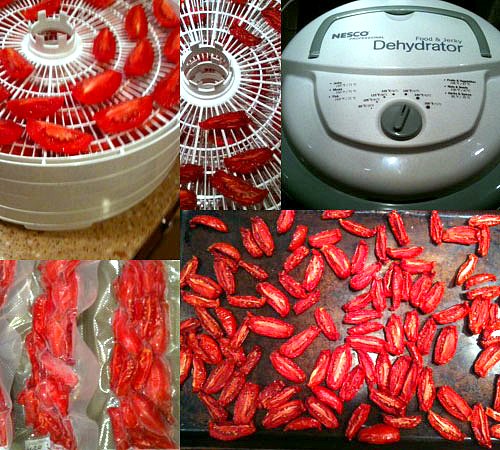
- If you don't feel like hijacking your oven for an entire day, a food dehydrator is a great option. The fenestrated trays allow even heat and air circulation around the tomatoes. The trays stack vertically so you can pack a lot of tomatoes in a small space. The unit I have came with 5 trays, but will accommodate up to 12, and its smaller size makes for more efficient heating than the oven. Excellent dehydrators are available at reasonable prices from a number of retailers. The one depicted here costs about $60, but good models can be found in the $30 to $40 range, or you can spend a couple hundred dollars if you're going into the sun dried tomato wholesale business. It can also be used for dehydrating other fruits and vegetables, herbs, even jerky. Just space the tomato slices out on the tray. They can be close but you don't want them touching each other. Sprinkle with salt as above, and set the temperature between 135 and 145 degrees. Check them towards the finish, they are typically done after 8 - 12 hours.
- After removing from your oven or food dehydrator, they are ready for immediate use or storage in your freezer. I like to cool them on a sheet pan in the freezer for about an hour to harden them before sealing them in a vacuum sealer. The vacuum sealer removes most of the air, allowing the tomatoes to keep their color and flavor for many, many months. If you don't have a vacuum sealer, you can use a ziploc bag, first pressing the air out with your hands, and then sucking as much air out as you can through a straw before sealing completely. While I wouldn't recommend purchasing a vacuum sealer just for dried tomatoes, it is a good investment for prolonging the freshness of many foods by months. I use mine all the time to preserve fruits, vegetables, meats, bread, and salumi. And it will extend the life of your sun dried tomatoes considerably over the ziploc method. The dried tomatoes can reabsorb moisture if the air and water are not removed well, and then they will grow mold and spoil. You can also store them tightly sealed in the fridge, but they'll only keep for a few weeks in there.
When you’re ready to use them, thaw them out in the fridge or at room temperature. You can use them dried as they are, or rehydrate them in some hot water depending on the application and consistency you’re looking for. My favorite use is to put them in oil with sea salt, oregano, basil, and garlic as discussed very elegantly here on Scordo. On a safety note, there is some controversy about preserving foods in oil at home as described. Although many people have been doing this for many years without incident, there aren’t good studies establishing this practice as safe. Many food safety authorities advise against it due the risk of bacterial contamination and proliferation of spores, especially clostridium botulinum, which could be fatal. To play it safe, I thaw out the tomatoes I need in small batches, soak the minced garlic in white vinegar for about 5 minutes before using it, and store the (sterilized) container in the refrigerator, thawing it out at room temperature as necessary before eating, then placing it back in the refrigerator and consuming them within a couple of weeks. Food is generally more enjoyable if you’re not afraid of dying from it.
Enjoy your sun dried tomatoes on salad or pasta; chopped with olives and feta cheese over chicken, salmon, or any white fish; as a topping for crostini or pizza; or plain as an antipasto with good bread, cheese, and olives. You can still call them sun dried. I won’t tell. Promise.

Looks great, the flavors must be intense! I dehydrate my garlic and make garlic power. Never did tomatoes, thank you for the idea…
Wow, never thought to dehydrate my own garlic for garlic powder. Dehydrating tomatoes is something we do out of necessity because we can’t sun dry them like they do in Italy given where we live here in the US.
great idea. Learned the idea from a neighbor to do the same with bell peppers. Intense flavor. You can eat them as crunchy snacks, or crush them into a sweet bell peppery powder
I dehydrate then run through food blender til i have a powder, add spices to taste then vac seal, just add water and you have tomato sauce, works well for camping.. no jars to break
If you dry them completely you can store the tomatoes in a glass jar out of direct light. They will last very, very long. I dehydrate zucs, summer squash, leeks, carrots, green beans and celery and make my own bullion, soup mixes and camping supplies. Apples and other fruit dry nicely as well. The leeks are awesome. Just made potato leek soup with my dried leeks!